Excel Templates are typically workbooks, with a reporting framework, often supported by functions. A templates (xltx) can be used over and again without polluting it with data. After population with data, a template workbook is saved as an xlsx, preserving the virgin state of the xltx itself.
In this exercise we will use VBA code to open and populate a template. The template can be found here and Excel Macro used can be found here.
This article assumes the reader has the Developer ribbon displayed and is familiar with the VBA Editor. If not, please Google “Excel Developer Tab” or “Excel Code Window”.
The Template
First, we’ll build a dummy template, populated with data, a pivot table and a chart, as follows:
Open a new Excel file. Rename “Sheet1” as “Chart” and “Sheet2” as “Data”
Copy the following text, including headings, into D1 of the “Data” tab:
| Directorate | JobRef | Gender |
| Children and Family | CH SW2588 | Female |
| Children and Family | CH RS2775 | Female |
| Children and Family | CH SW2630 | Female |
| Children and Family | CH RS2775 | Male |
| Children and Family | CH CC2628 | Female |
| Children and Family | CH HT2579 | Female |
| Community Health | CW T(2559 | Female |
| Community Health | CW QS2774 | Female |
| Community Health | CW O2745 | Male |
| Environment | EE SM2814 | Female |
| Environment | EE IT2772 | Male |
| Environment | EE SO2784 | Male |
| Resources | RS CO2557 | Female |
| Resources | RS HO2539 | Male |
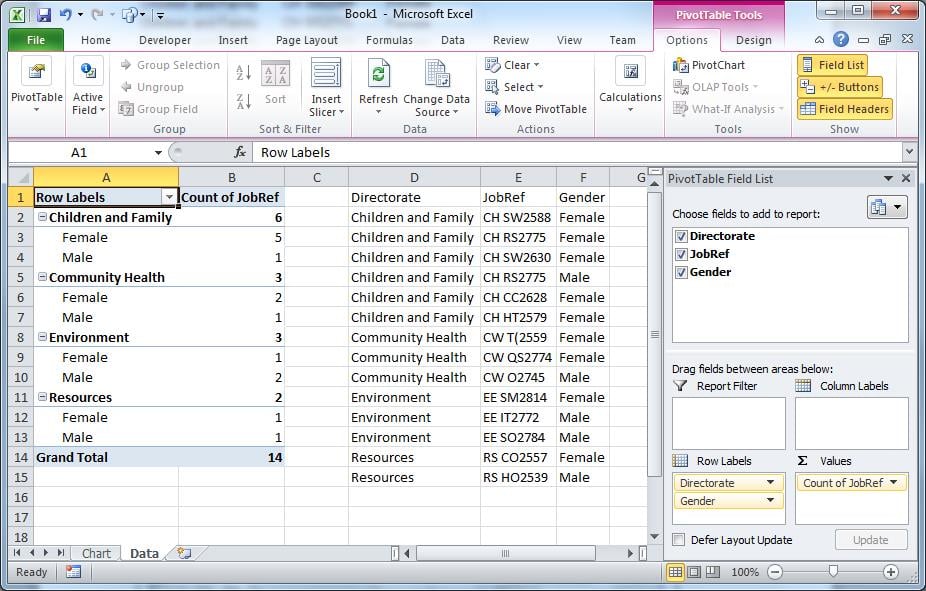
Select all the data, including column headings, and insert a pivot table at A1 of the “Data” sheet, as shown below.
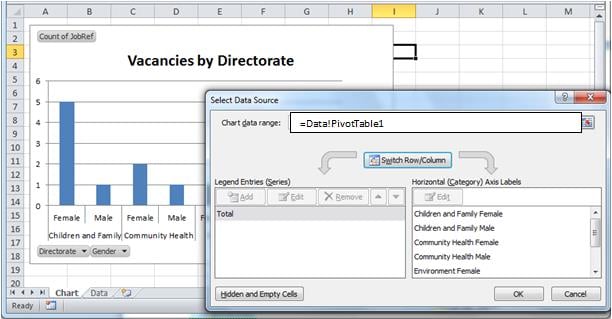
Create a chart on the “Chart” tab, using the pivot table as a data source.
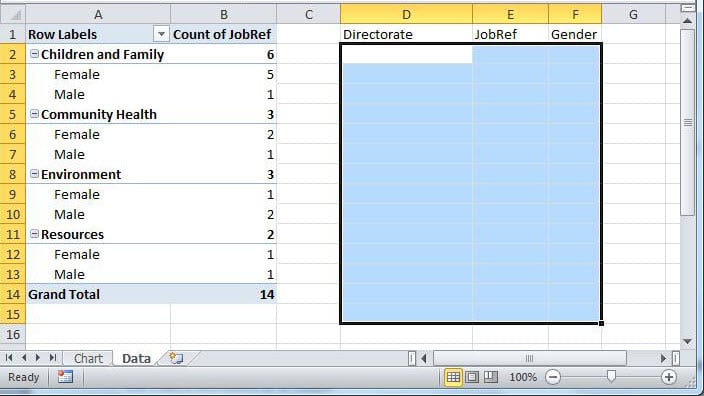
Remove the data in D2:F15. It is not necessary to reset the pivot table data range; leave it populated even if there is no data.
Save the workbook as “VacancyTemplate.xltx.” in a sub-directory of the one in which the macro workbook is to reside. Respond “No” to any alerts from Excel during the save.
We will also need a Reports sub-directory. For example:
Excel Reports (xlsm stored here)
|_Templates (xlxt stored here)
|_Reports (each xlsx saved here)
Once saved as an xltx, close the template
The Macro
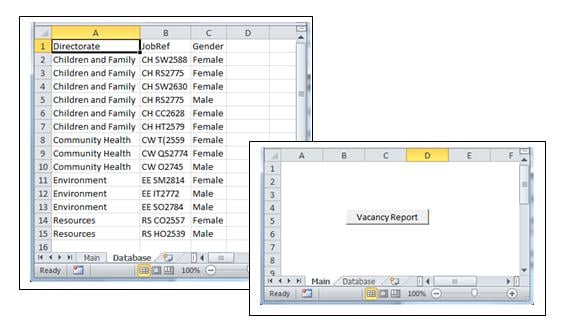
Open a new workbook to hold our code. Rename “Sheet1” as “Main” and “Sheet2” as “Database”.
Place a button on “Main” to drive the application.
Normally, data is retrieved from databases. Since not everyone has a database handy, the “Database” sheet will emulate a database table.
Copy the data found at the start of this article into the “Database” tab at A1…
The Code
The code structure below clearly defines the processes:
- Get the data from the “database”;
- Open the template;
- Populate the template with the data and reset the pivot table data range;
- Save the template as a report
Option Explicit
    'Create objects to represent the template workbook and worksheets
    Public wb As Object
    Public XL As Object
    Public connDB As New ADODB.Connection
    Public rs As ADODB.Recordset
    Public eRow As Integer
    Public eRec As Integer
    Public dDate As String

Sub openWorksheet()
    Call GetData
    Call OpenTemplate
    Call PopulateTemplate

    'Save template as datestamped xlsx
    On Error Resume Next
    dDate = Format(Now(), "yyyy.mm.dd")
    wb.SaveAs Filename:=ActiveWorkbook.Path & "\Reports\Vacancies" & dDate & ".xlsx", _
         FileFormat:=xlOpenXMLWorkbook, CreateBackup:=False

     Sheets("Main").Activate        'Move off the database tab
     wb.Activate            'Bring the chart to the fore
     Set wb = Nothing
     Set XL = Nothing
     Set rs = Nothing
     Set connDB = Nothing
End Sub

Sub GetData()
    'Emulate database retrieval
    If connDB.State = 1 Then connDB.Close
    Sheets("Database").Activate
    Sheets("Database").Range("A1").Select
    Selection.End(xlDown).Select

    eRec = ActiveCell.Row - 1 'establish how many records will be in the recordset
                     'This step won't be needed in a database environment
    eRow = ActiveCell.Row   'the end row, used later in the template

    connDB.Open "Provider=Microsoft.ACE.OLEDB.12.0;" & _
      "Data Source=" & ActiveWorkbook.FullName & ";" & _
      "Extended Properties=Excel 12.0;"

    Set rs = New ADODB.Recordset
    rs.Open "Select top " & eRec & " * from [Database$]", connDB, , , adCmdText
End Sub

 Sub OpenTemplate()
    Set XL = CreateObject("Excel.Application")
    XL.Visible = True       'enables us to see what's happening on debug.
    XL.Workbooks.Add ActiveWorkbook.Path & "\Templates\VacancyTemplate.xltx"
    Set wb = XL.ActiveWorkbook             'the new workbook is referenced by "wb"
 End Sub

 Sub PopulateTemplate()
    wb.Sheets("Data").Activate
    wb.Sheets("Data").Range("D2").CopyFromRecordset rs
    wb.Sheets("Data").Range("A1").Select

    'resize the range driving the pivot table, using the eRow variable.
    wb.Sheets("Data").PivotTables("PivotTable1").ChangePivotCache wb. _
        PivotCaches.Create(SourceType:=xlDatabase, SourceData:="Data!R1C4:R" & eRow & "C6", _
        Version:=xlPivotTableVersion14)
    wb.Sheets("Chart").Select

 End Sub
ActiveX Data Objects
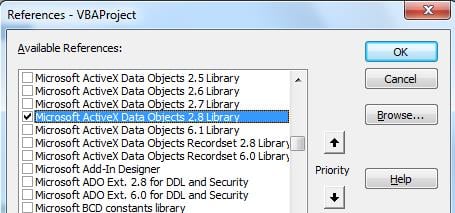
In order to simulate a database read, we must reference the Active X library. Do this through Tools>References from the code window.
Test the Code
Assign the button on “Main” to Sub Openworkbook. Save the workbook as “Populating Templates.xlsm”.
CLOSE the workbook, and re-open it.
Press the button view the result. Increase the number of data rows in “Database”, and run again, seeing if the Chart has been updated with the additional information.
In the code above we have shown the template early, with XL.Visible = True. In the live environment, this can be done at the very end, so that screen updates are not visible.
Deal with Data Disaster!
Few things are more frustrating than a much-developed Excel file crashing, corrupting the source file, and with no backup copy available. In such cases, where Excel fails to recover the damaged file, all work done thereon is lost unless you have a tool handy to fix Excel files.
It is also prudent to frequently back up valuable work.
Author Introduction:
Felix Hooker is a data recovery expert in DataNumen, Inc., which is the world leader in data recovery technologies, including rar repair and sql recovery software products. For more information visit www.datanumen.com
