Discover proven methods to recover corrupted Excel files, from built-in Excel features to specialized repair tools and advanced techniques.
1. Understanding Excel File Corruption
Excel file corruption creates major problems for businesses and individuals. In this section, we will discuss every aspect of Excel file corruption.

1.1 Common Causes of Excel File Corruption
Below are some common causes of Excel file corruption:
- Unexpected computer shutdowns from power outages, hardware or software problems.
- Virus attacks and malware.
- Hard disks fail, especially when Excel files are stored in affected sectors.
- Large files with many formulas and links have higher risks of getting corrupted.
- Multiple users try to access the same file simultaneously.
- Access the Excel file on a network drive.
1.2 Useful Tips to Prevent Excel File Corruption
We have summarized several useful tips to prevent Excel file corruption. However, when it really happens, you still need an effective method to repair the corrupted file.
1.3 Common Signs of a Corrupted Excel File
When corrupted, your Excel file might show these signs:
- Files cannot open
- Files take unusually long to load
- Crashes or freezes during operations frequently
- Missing data entries or formulas
- Layout problems or broken headers
- Unreadable or random characters, or incomprehensible code
- Error messages that keep appearing
- Changes won’t save or update
- Unexpected errors during save operations
- AutoRecover does not work
1.4 Identifying Different Types of Corruption
Corruption shows up in different ways. Some files become completely unusable, while others work partially with limited features. Studies show that 88% of spreadsheets have errors. This makes early detection of corruption vital.
1.5 Error Messages when File is Corrupted
Below is the common error messages you will see when the Excel file is corrupted, we use ‘filename.xlsx’ to express your corrupt Excel file name.
- Excel cannot open the file ‘filename.xlsx’ because the file format for the file extension is not valid. Verify that the file has not been corrupted and that the file extension matches the format of the file. (Error 101590)
- Excel cannot open this file. The file format or file extension is not valid. Verify that the file has not been corrupted and that the file extension matches the format of the file.
- The file format and extension of ‘filename.xls’ don’t match. The file could be corrupted or unsafe. Unless you trust its source, don’t open it. Do you want to open it anyway?
- The file is corrupt and cannot be opened.
- This file is not in a recognizable format.
- Excel file is not in a recognizable format.
- Excel found unreadable content in <filename.xlsx>.
- Unable to read file.
- ‘filename.xls’ cannot be accessed. The file may be read-only, or you may be trying to access a read-only location. Or, the server the document is stored on may not be responding.
- Microsoft Excel has stopped working.
- The converter failed to open the file.
- The converter necessary to open this file cannot be found.
- We found a problem with some content in ‘filename.xlsx’. Do you want us to try to recover as much as we can? If you trust the source of this workbook, click Yes.
- Sorry, we couldn’t find filename.xlsx. Is it possible it was moved, renamed or deleted?
1.6 Effect on Business Operations
File corruption affects business operations heavily. Small businesses face higher risks, and FEMA reports 40% never reopen after losing their data. The situation becomes more critical since 88% of spreadsheets have errors. These errors make files vulnerable to fraud, corruption, and mismanagement. File integrity is vital for stable operations and financial security.

2. Using DataNumen Excel Repair to Repair Corrupted Excel File
DataNumen Excel Repair helps users recover corrupt Excel files with amazing precision. The software works with all Excel versions.
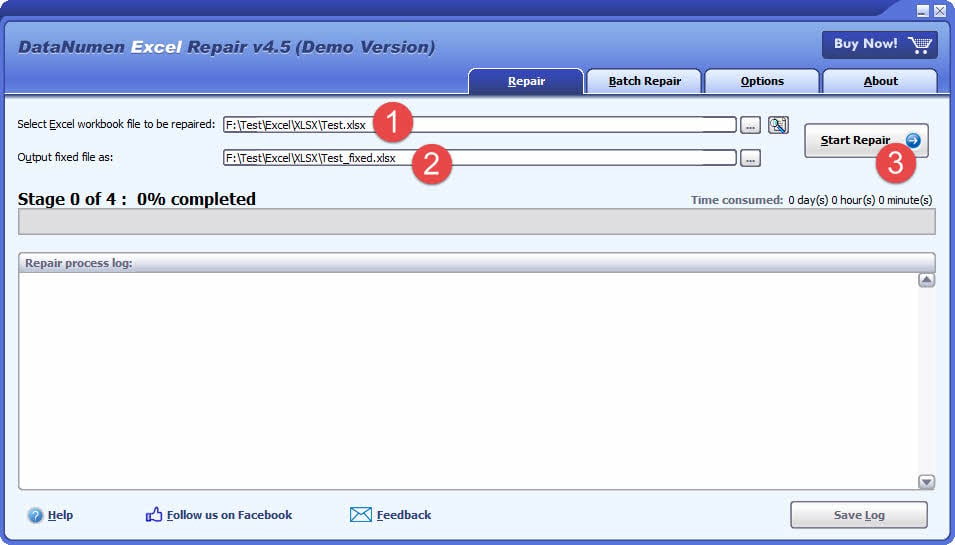
2.1 Repair a Single Excel File
To repair a single corrupt Excel file, please do as follows:
- Close Microsoft Excel and other applications that may modify your source Excel file.
- Select the source Excel file (.xls/.xlsx).
- If the source file is test.xls/test.xlsx, the output file name will be set to test_fixed.xls/test_fixed.xlsx automatically. Note the output file format is set based on the version of Excel on your local computer. For Excel 2003 or earlier versions, the output file will be in .xls format. For Excel 2007+, it will be in .xlsx format. You can also change the output file name manually (.xls/.xlsx).
- Click the “Start Repair” button
- After the repair process, DataNumen Excel Repair will output a new fixed Excel file.
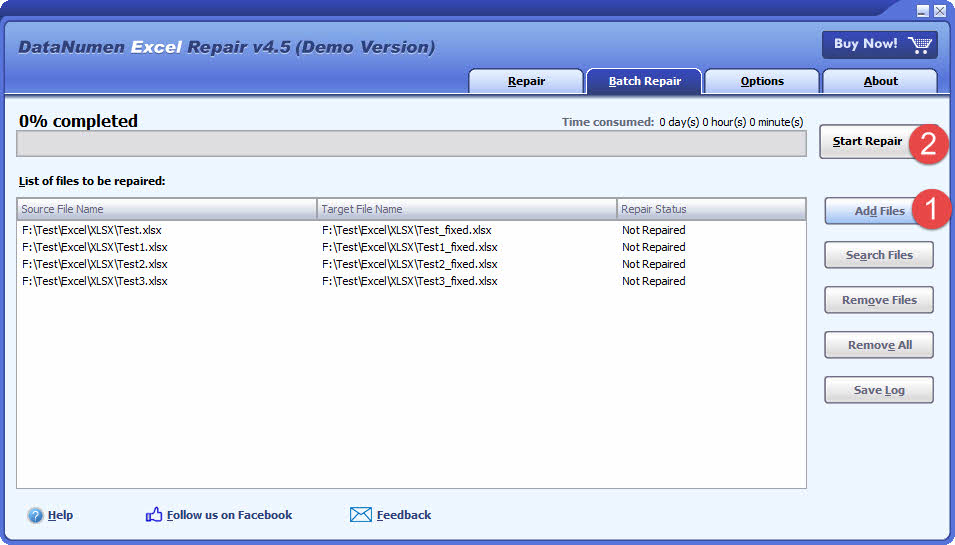
2.2 Repair a Batch of Excel Files
DataNumen Excel Repair makes the processing of multiple corrupted files easy. You can select multiple Excel files or search those match specific criteria from your computer, then repair them in batch, as below:
- Go to the “Batch Repair” tab.
- Click “Add Files” to add multiple Excel files (.xls/.xlsx) to be repaired.
- You can also click “Search Files” to find files to be repaired on the local computer.
- Click the “Start Repair” button
- All the Excel files in the list will be repaired one by one.
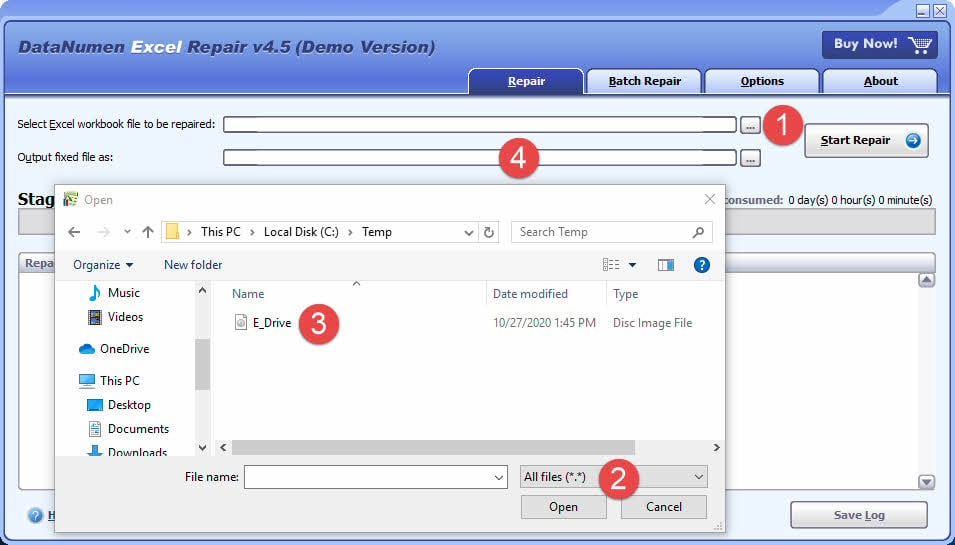
2.3 Recover Excel Data from Hard Drive, Disk Image, or Backup Files
Excel data can be recovered directly from hard drives, disk images, or backup files if you do not have the Excel files any more, for example:
- You delete the Excel XLS/XLSX file permanently.
- You format the hard drive.
- Hard drive failure.
- The virtual disk in VMWare or Virtual PC is corrupt or damaged.
- The backup file on the backup media is corrupt or damaged and you cannot restore the Excel XLS/XLSX file from it.
- The disk image file is corrupt or damaged and you cannot recover your Excel file from it.
If you have the disk image or backup files on hand, then you can do as follows:
- Click “…” button to select the source file.
- In the “Open File” dialog, select “All Files (*.*)” as the filter.
- Select the disk image or backup file as the source file to be repaired.
- Set the output fixed Excel file, and make sure its extension is .xlsx if you have Excel 2007+ installed, for example, E_Drive_fixed.xlsx, otherwise, use .xls extension, for example, E_Drive_fixed.xls.
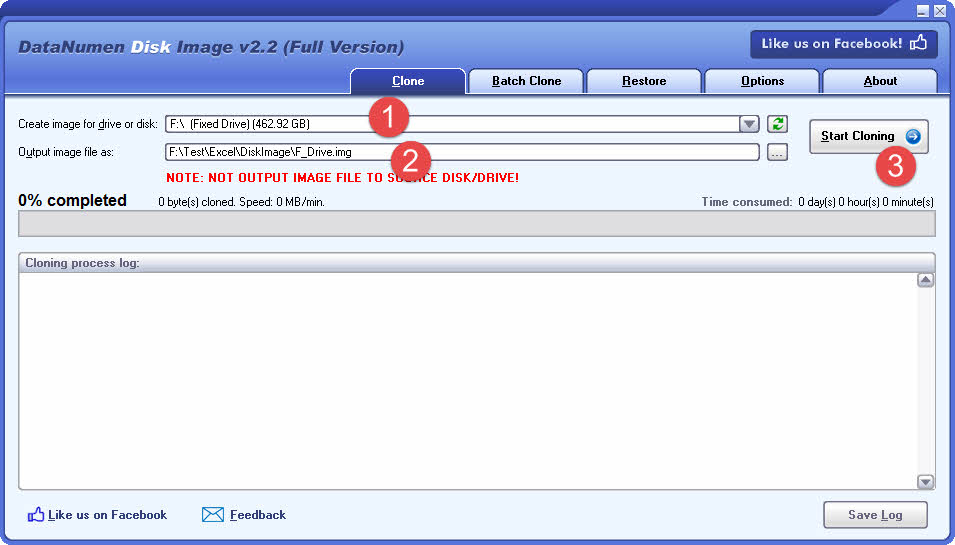
If you want to recover from hard drive directly, you need to use DataNumen Disk Image to create a disk image file for the hard drive:
- Select the hard drive or disk.
- Set the output image file name.
- Click “Start Cloning” button to create the disk image file from the hard drive/disk.
2.4 Recover from Ransomware or Virus
Back up your infected files right away if ransomware or virus hits your files. Then you can use DataNumen Excel Repair to scan these files and try to restore access to your data. The advanced scanning features will help reduce data loss from ransomware or virus infected files.
2.5 Repair a Recovered File
Sometimes the files recovered by DataNumen Data Recovery or other similar data recovery tools still cannot open in Excel. In such a case, you can use DataNumen Excel Repair to repair the recovered file which is openable in Excel.
3. Built-in Methods to Repair Corrupted Excel Files
Microsoft Excel comes with powerful built-in tools that help users recover corrupted Excel files without needing third-party software. These features act as your first defense when files get corrupted.
3.1 Using Excel’s Open and Repair Feature
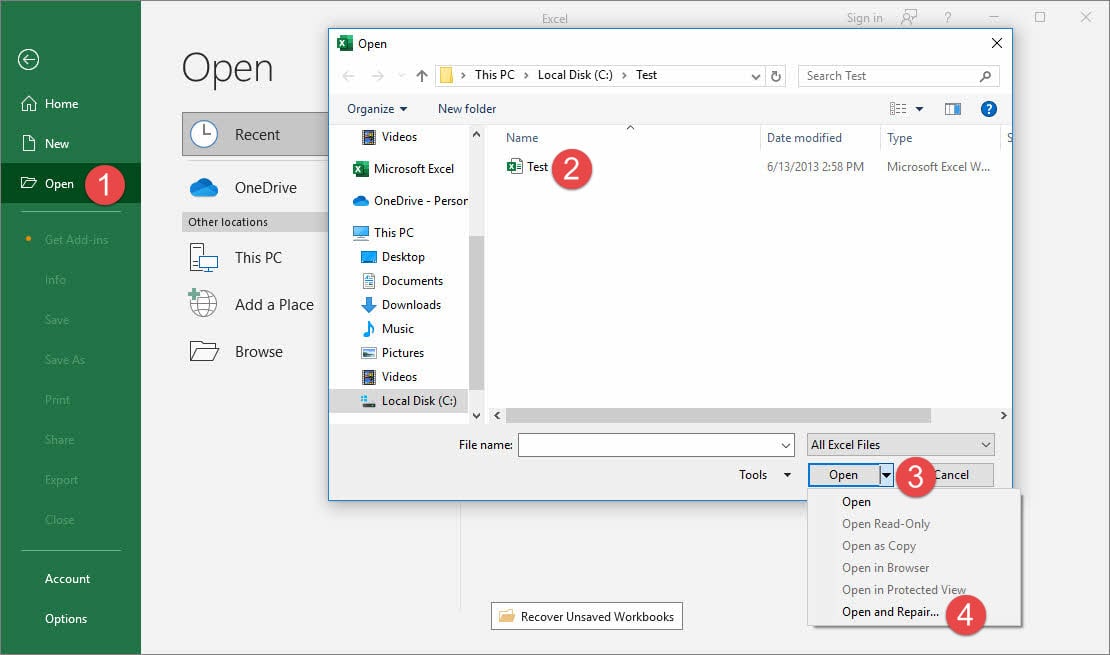
Excel has a built-in repair process through its Open and Repair feature. You can use this feature by following these steps:
- In Excel, click File > Open
- Select the corrupted Excel file
- Click the arrow next to Open button
- Choose Open and Repair
- Select Repair to recover maximum data
- If that doesn’t work, use Extract Data to retrieve values and formulas
For more information, you can also visit the official Microsoft page ![]() .
.
3.2 Recovery via AutoRecover
Excel protects your work automatically through the AutoRecover feature. This feature will auto-save unsaved versions of your workbooks to a specific location at the set interval.
3.2.1 Set up AutoRecover
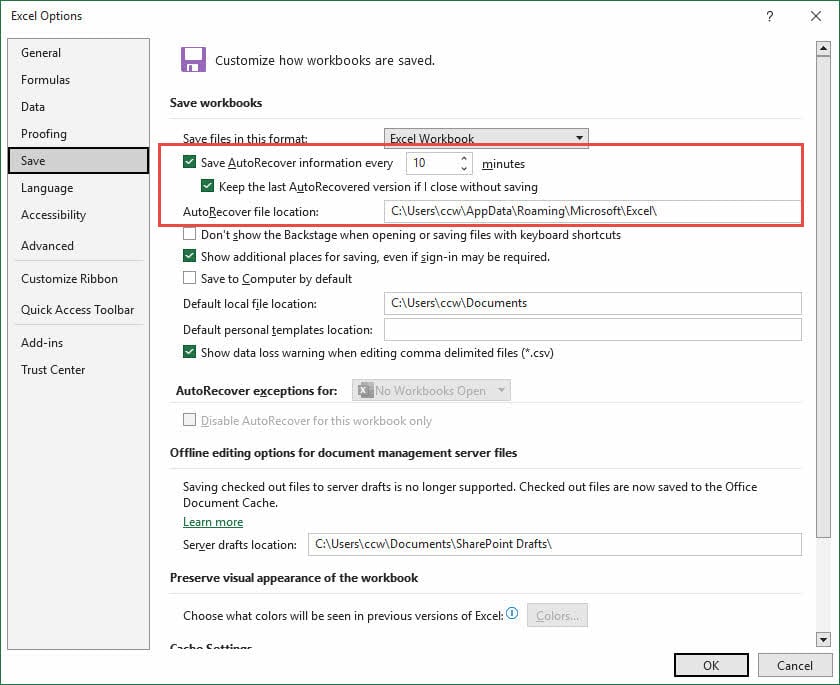
You can set up AutoRecover as below:
- In Excel, open File > Options > Save
- Enable Save AutoRecover information (Enabled by default)
- Set the time interval (default is 10 minutes)
- Verify AutoRecover file location
3.2.2 How AutoRecover Works
Let’s explain how AutoRecover works:
- When you create a file Test.xlsx, then make a change to it, but do not save it. Then after the preset time interval, AutoRecover will create a subfolder in the preset AutoSave file location, like this:
C:\Users\ccw\AppData\Roaming\Microsoft\Excel\Test#####
where the long number ##### is a unique identifier Excel uses to distinguish between different AutoRecover sessions. Then it will save the change to an auto-recovered file Test((Autorecovered-#####)).xlsb. The long number in the parentheses is a unique identifier Excel uses to distinguish between different change sessions. Notice they are saved as .xlsb (Microsoft Excel Binary Worksheet) format for better performance and smaller file size, even though your original file is .xlsx.
- If later you save Test.xlsx, AutoRecover will NOT delete the first auto-recovered file.
- If you make another change on the file, but do not save it. Then after the preset time interval, AutoRecover will save the change to a 2nd auto-recovered file Test((Autorecovered-#####)).xlsb, with a different unique identifier to differentiate itself from the first auto-recovered file.
- The above procedure will continue if you make changes continuously but do NOT save them before the preset time interval elapses. So there may be multiple auto-recovered files in the subfolder.
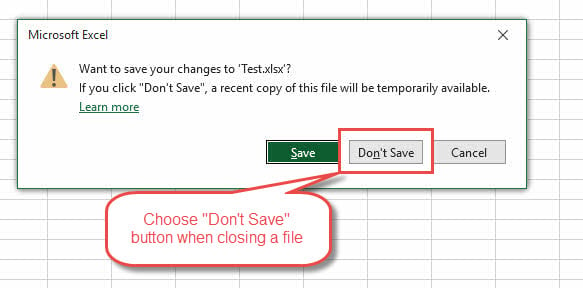
- If in the end, you close Test.xlsx but choose NOT to save it, then all the auto-recovered files will be deleted except for the latest one, which will be renamed to an unsaved file, Test((Unsaved-#####)).xlsb, where the unique identifier ##### is identical to that of the corresponding auto-recovered file:

- If you choose “Save”, all the auto-recovered files and previous unsaved files will be deleted, and the subfolder itself will be deleted as well. Next time when you open and edit the same file, AutoRecover will create a new subfolder Test#### with a different unique identifier.
3.2.3 A Real Example
Below is a real sample:

From this sample, we can see:
- Test311582750060201638 is the AutoRecover subfolder for Test.xlsx.
- Test((Unsaved-311583441505446697)).xlsb is the unsaved version BEFORE the last close of the file.
- The following files are the auto-recovered files AFTER the last open of the file:
Test((Autorecovered-311583633426885544)).xlsb
Test((Autorecovered-311583641215697279)).xlsb
Test((Autorecovered-311583653173513157)).xlsb
The time stamps for these files will be newer than the unsaved file.
- Test.xlsx is a shortcut to the actual file Test.xlsx.
3.2.4 Use AutoRecover when Your File is Corrupt
Now the good news is that AutoRecover is enabled by default. So if you cannot open and recover a corrupt Excel file, you may have chances to recover a newer or older version of the file via the AutoRecover feature.
3.2.5 Use the “Recover Unsaved Workbooks” Feature
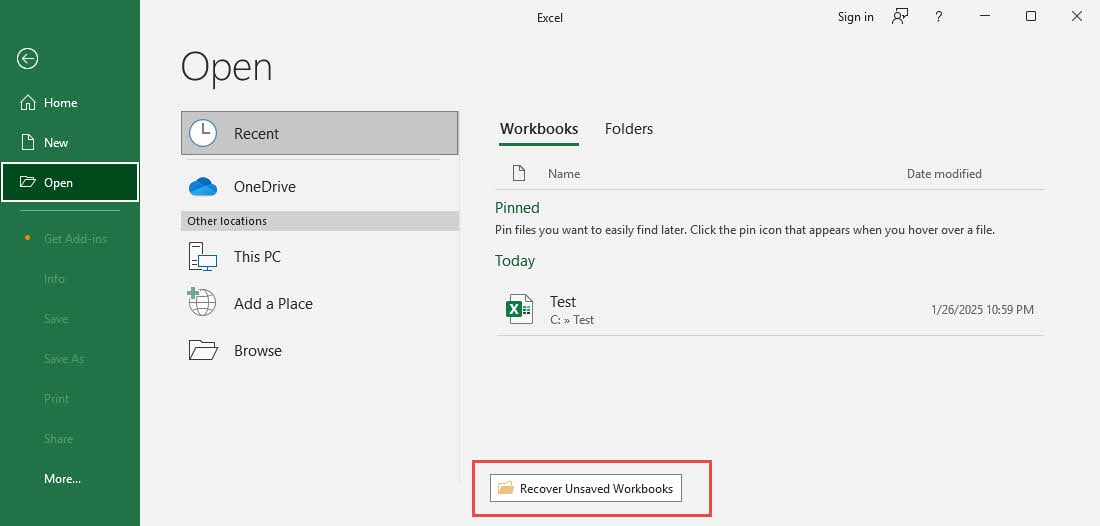
- In Excel, click File > Open
- Click Recover Unsaved Workbooks button

- Find and select the .xlsb file for your corrupt File in the AutoRecover file location. Either unsaved version or auto-recovered version is OK. Just choose the one with your wanted contents.
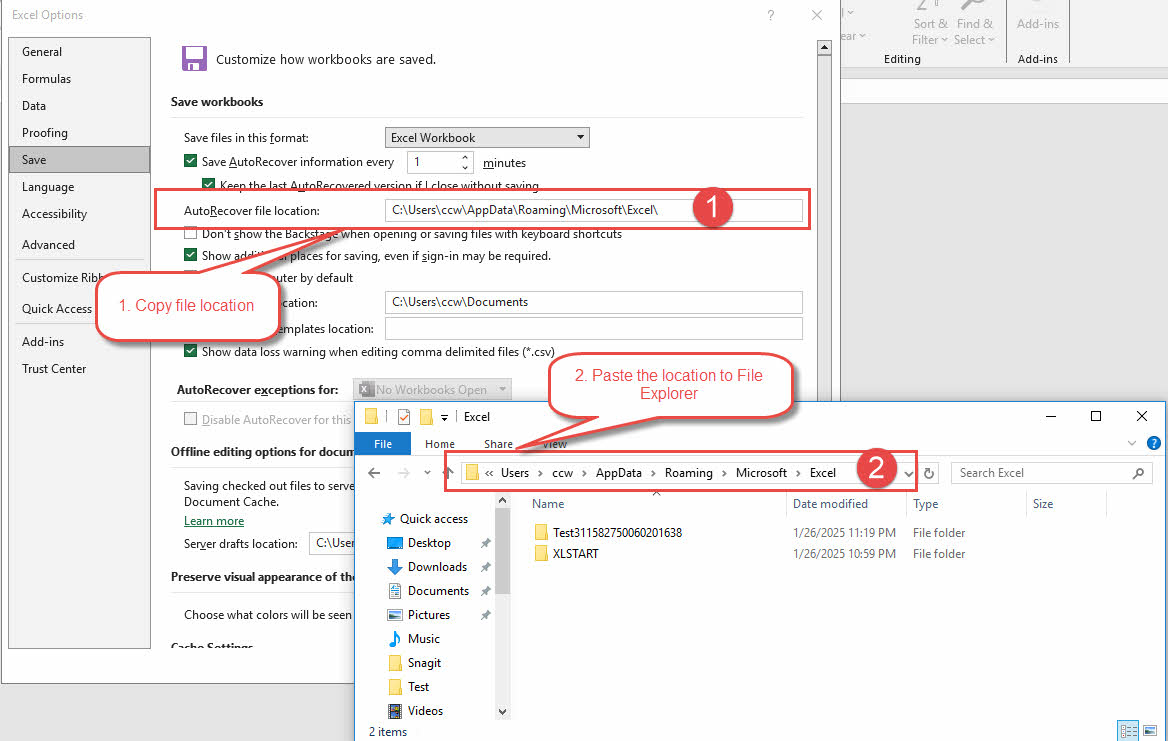
3.2.6 Find and Recover Files Manually
You can also manually open the “AutoRecover file location” and find the wanted files:
- Copy the “AutoRecover file location” in Excel.
- Paste it to Windows File Explorer.
3.2.7 Use “Document Recovery” Panel
If your file gets corrupted due to an unexpected shutdown of Excel, then when you use Excel to open it again, other than the error message saying your file is corrupt, you will also see the “Document Recovery” panel in the left, which provides some more information about the different versions, so that you can choose the one you want:
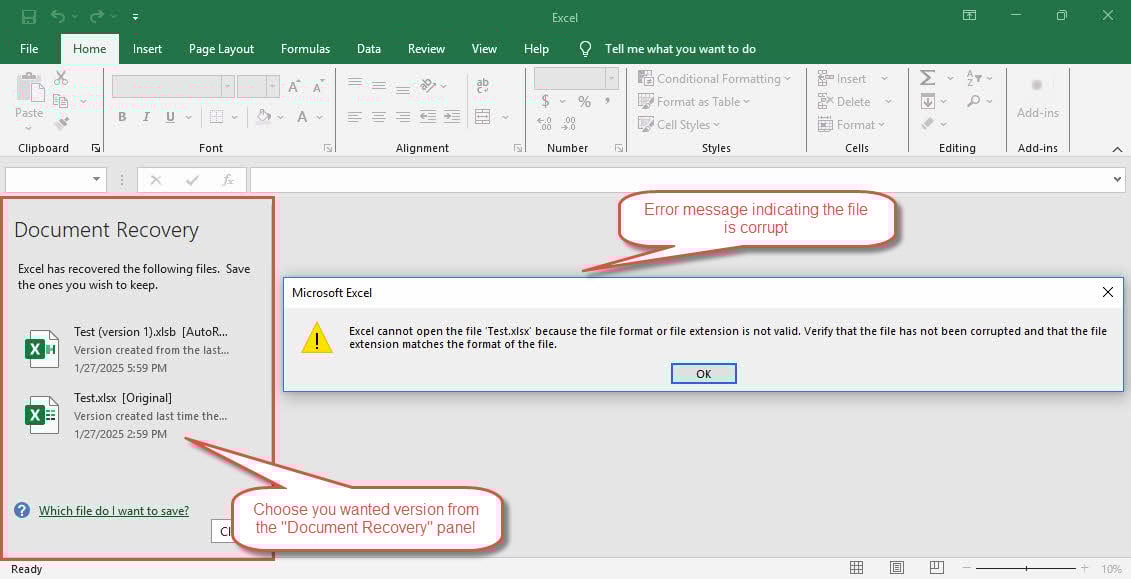
Sometimes when you click one version, you will still get an error message saying Excel fails to open it. In such a case, try another version instead until you find a healthy one.
3.2.8 Important Notes
- AutoRecover is NOT AutoSave, another feature described below.
- AutoRecover is NOT auto backup. It will NOT save unsaved versions if you save your file before the time interval elapses. It will also NOT keep the intermediary version if you save your file and close it. To auto backup your files, you need to enable another option described below.
- To increase the chances of recovering files via AutoRecover, you can decrease the time interval to a minimum of 1 minute. However, this may decrease Excel performance when processing huge files.
You can find AutoRecover information in the official Microsoft page ![]() as well. However, they do not offer comprehensive information like we do.
as well. However, they do not offer comprehensive information like we do.
3.3 Recovery via AutoSave
AutoSave is another feature that can help you when your file is corrupt. Many people often confuse AutoRecover and AutoSave, mistakenly believing they are the same, but in reality, they are entirely different. AutoSave, when enabled, will auto save your file to cloud storage such as OneDrive, every few seconds.
AutoSave is only available in Excel for Microsoft 365. It is enabled by default for file on OneDrive, OneDrive for Business, or SharePoint Online. But disabled for file on the local computer.
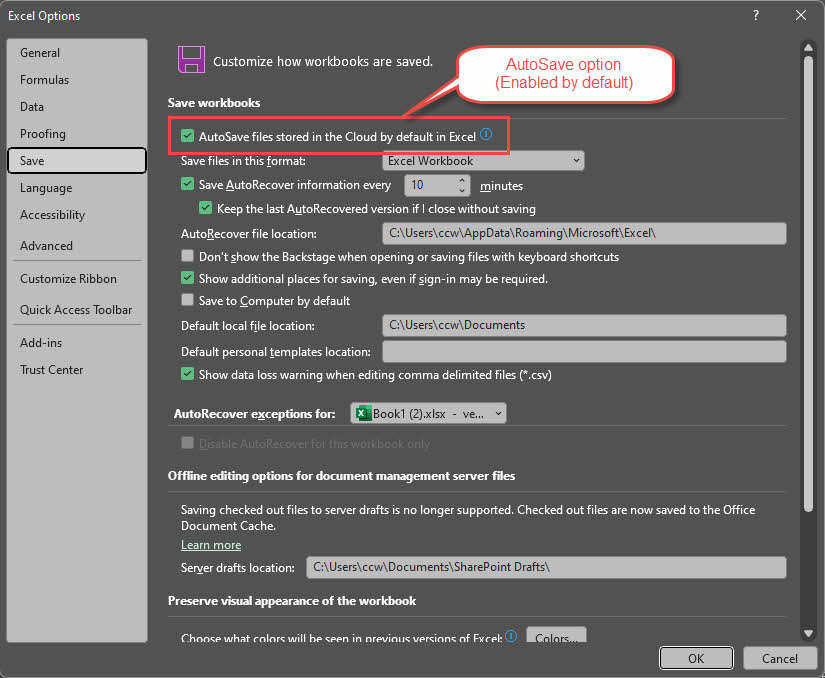
3.3.1 AutoSave Option
You can find the AutoSave option by:
- In Excel, open File > Options > Save
- You can find AutoSave files stored in the Cloud by default in Excel option. It is enabled by default and we recommend you always keep it enabled unless for special cases.
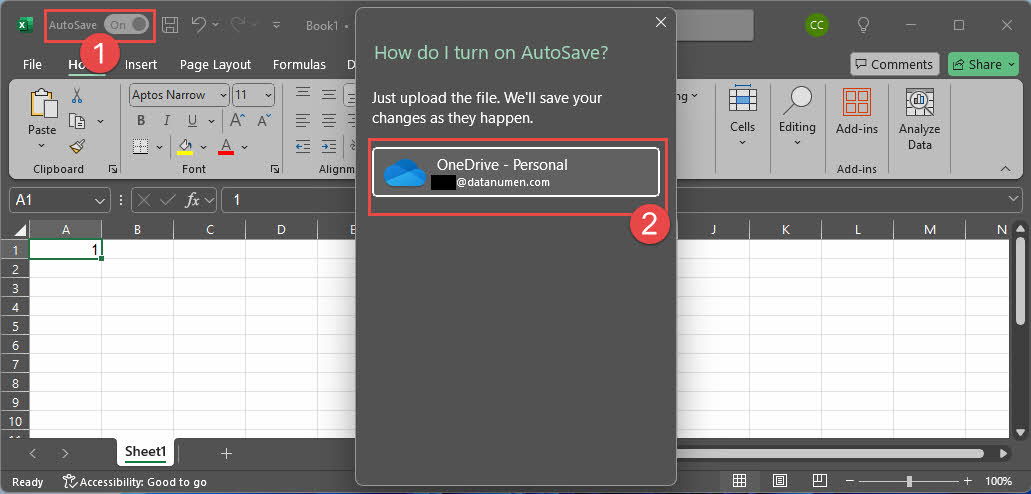
3.3.2 Enable AutoSave for Local File
It is also possible to enable AutoSave for files on the local drive, as below:
- Open the local file in Excel
- Turn on the AutoSave toggle in the top-left corner.
- A dialog will pop up. Then you can choose the Cloud drive to store the auto-saved files.
- From then on, your local file will be uploaded to the Cloud drive. And all future updates will be saved there. The local file will NOT be updated anymore.
3.3.3 Recover Corrupted Excel File
When your file on the Cloud is corrupt, you can utilize the “Version History” function in AutoSave to restore to an old version that is healthy:
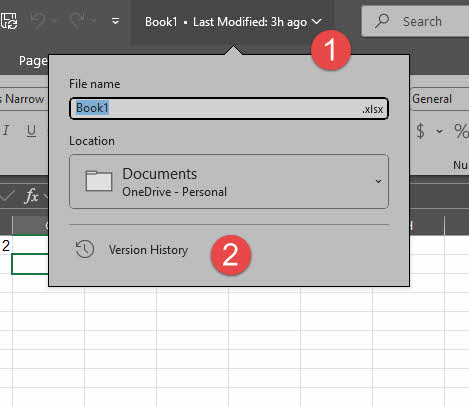
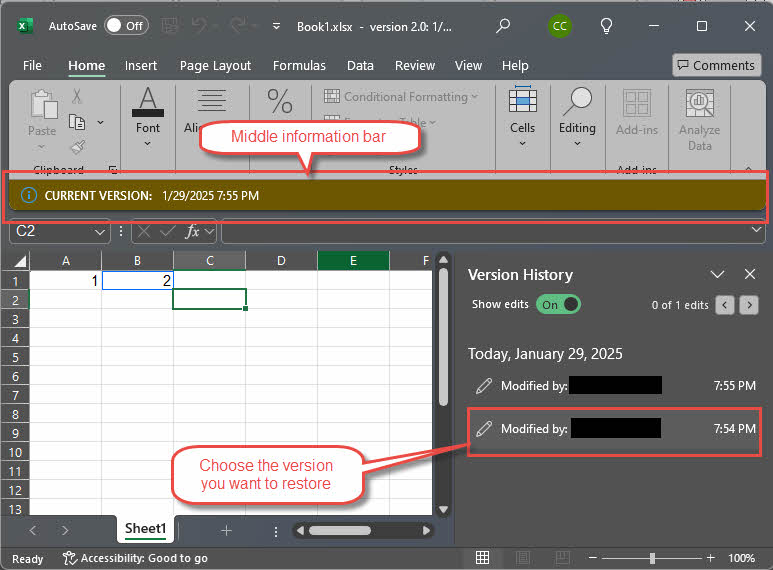
- In Excel, click the file name in the top bar.
- In the popup menu, click Version History.

- The version history will show in the right panel.
- Click the version you want to restore:

- In the middle information bar, click Restore to restore to that version:

3.3.3 References
- Microsoft official page: What is AutoSave?

- Microsoft official page: How do I turn on AutoSave?
3.4 Recover via Auto Backup
You can also create automatic backup copies. This gives you access to your data if the original file becomes corrupted. However, unlike AutoRecover, auto backup is NOT enabled by default.
3.4.1 Enable Auto Backup Manually
Enabling auto-backup is simple:
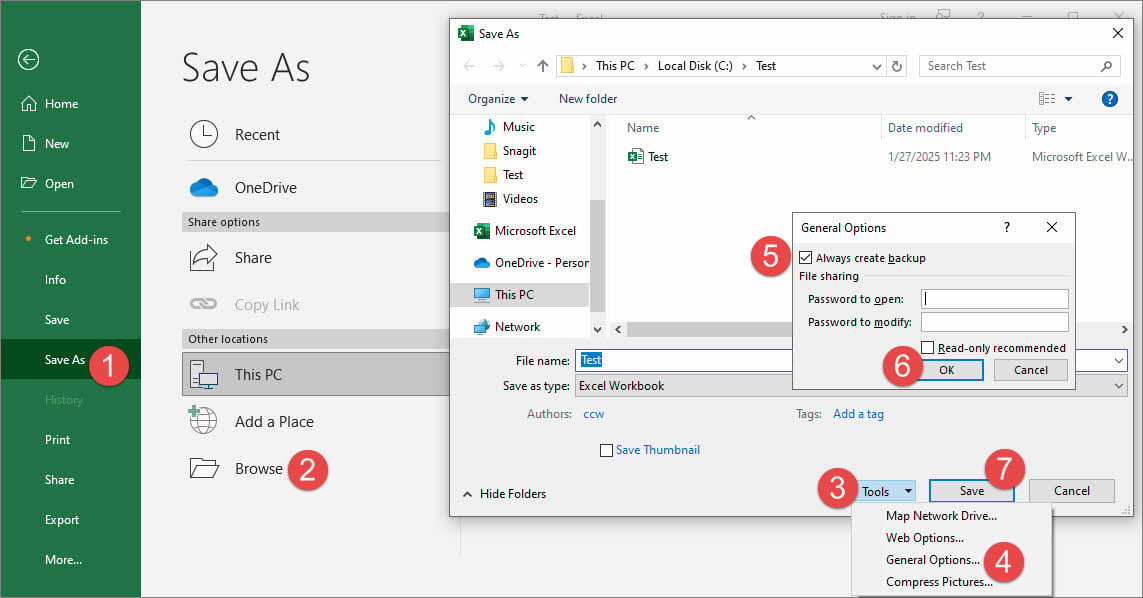
- In Excel, open the file that you want to set up the auto-backup.
- Select File > Save As > Browse.
- Click Tools > General Options…
- Check Always create backup option and click OK button.
- Click Save button and confirm replacing the existing file.
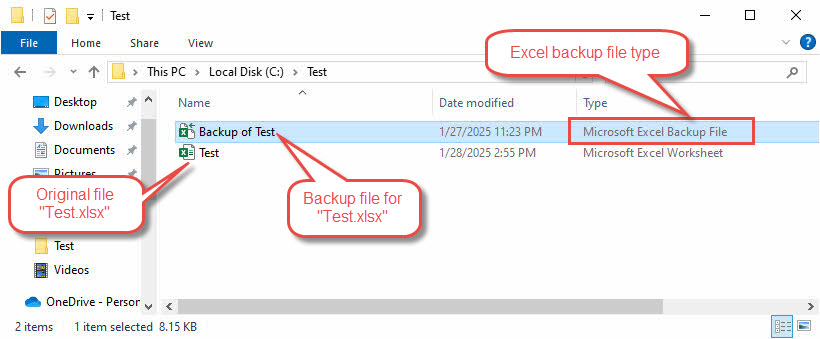
Since then, if the original file is “Test.xlsx”, there will be a “Backup of Test.xlk” file for it. Note .xlk is the file extension for Microsoft Excel backup file:
3.4.2 Notes:
- Auto backup is NOT a global option, but a per-file option. If you enable auto-backup for one file, it will NOT enabled for others.
- Auto backup will NOT backup the current version but the version before you save. And the save operation actually save the changes to the original file, making it the current version.
- The first time when you use “Save As” to save a new Excel file with the backup option, Excel will NOT create the backup file, since there is no version available before you save.
- If the original Excel file is corrupt and you have enabled auto-backup for it, then you can get the version before you save from the backup.
- When you open the .xlk backup file, you will see the following warning:

Just ignore it and click Yes to open the file.

3.4.3 Enable Auto Backup for a Batch of Files
The Excel VBA method Workbook.SaveAs ![]() has an optional parameter CreateBackup, which can be used to enable the auto backup for a file programminly. So we can write a simple VBA script to enable auto backup for a batch of files:
has an optional parameter CreateBackup, which can be used to enable the auto backup for a file programminly. So we can write a simple VBA script to enable auto backup for a batch of files:
Option Explicit

Function BatchEnableBackup()
    Dim fd As FileDialog
    Dim i As Long
    Dim fileName As String
    Dim wb As Workbook
    Dim fileFormat As Long

    ' Configure file dialog
    Set fd = Application.FileDialog(msoFileDialogFilePicker)
    With fd
        .AllowMultiSelect = True
        .Title = "Select Excel Files to Enable Backup"
        .Filters.Clear
        .Filters.Add "Excel Files", "*.xls; *.xlsx; *.xlsm; *.xlsb"
        If .Show <> -1 Then Exit Function ' Exit if user cancels
    End With

    ' Process selected files
    For i = 1 To fd.SelectedItems.Count
        fileName = fd.SelectedItems(i)

        ' Attempt to open workbook
        On Error Resume Next
        Set wb = Workbooks.Open(fileName)
        On Error GoTo 0

        If Not wb Is Nothing Then
            Application.DisplayAlerts = False  ' Suppress overwrite warnings

            ' Save with backup enabled
            On Error Resume Next  ' Skip files that can't be saved
            fileFormat = wb.fileFormat
            wb.SaveAs _
                fileName:=fileName, _
                fileFormat:=fileFormat, _
                CreateBackup:=True
            On Error GoTo 0

            Application.DisplayAlerts = True
            wb.Close SaveChanges:=False
            Set wb = Nothing
        End If
    Next i
End Function
You can also download the Excel file with macro directly.
Another VBA read-only property Workbook.CreateBackup ![]() can be used to check if the auto backup for a file is enabled or not.
can be used to check if the auto backup for a file is enabled or not.
There is only very limited information about the auto-backup feature on the official Microsoft page ![]() .
.
3.5 Recover via Manual Calculation Mode
Switching the calculation mode from automatic to manual can prevent Excel from recalculating all the formulas in a workbook when opening it. This method can help to open and recover some corrupted Excel files if they do not need recalculation.
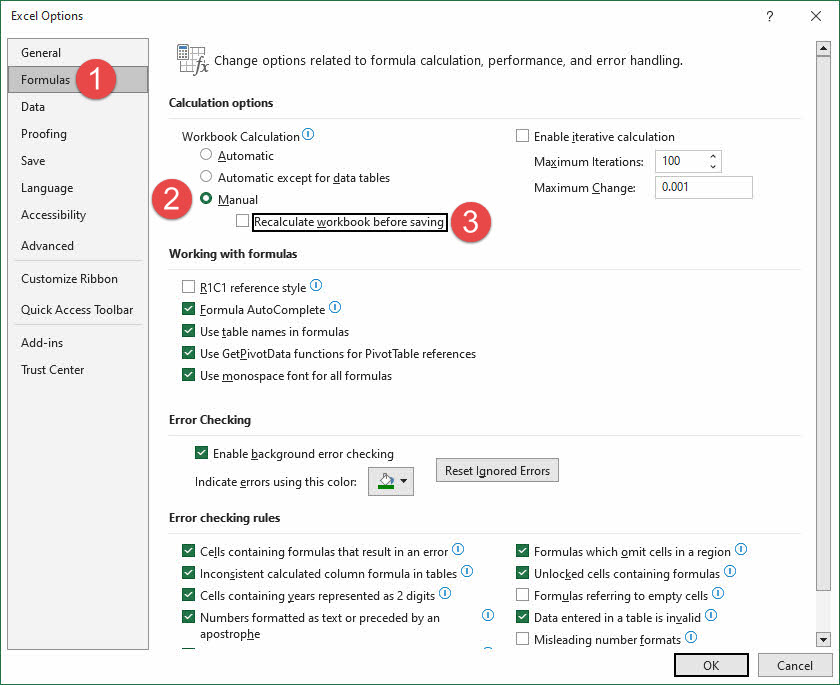
You can change calculation settings in this way:
- In Excel, open or create a new blank workbook.
- Click File > Options
- Navigate to Formulas tab
- Under Calculation Options, select Manual for Workbook calculation.
- Uncheck Recalculate workbook before saving.
- Click OK to save the changes.

- Try to open the corrupt file.
- If the file can be opened successfully, back up it by saving it as a new file.
Microsoft provides more information on changing formula recalculation mode ![]() and the current calculation mode
and the current calculation mode ![]() .
.
3.6 Open the File in Safe Mode
You can also try to open your corrupt file in safe mode ![]() . If it can be opened successfully, save a copy with a different name.
. If it can be opened successfully, save a copy with a different name.
4. Advanced Techniques to Recover Corrupt Excel Files
Advanced recovery techniques are great solutions for severely damaged Excel files. These methods help us focus on specialized formats and coding approaches that salvage data from corrupted workbooks.
4.1 SYLK Format Conversion Method
An Excel file uses a complex binary file format so it is prone to corrupt. If that happens, you can try to convert it to a text format, the SYLK (Symbolic Link) format, to filter out corrupted elements, then convert it back to Excel format. This method is especially useful for printer-related issues. But it requires your corrupt file can be opened in Excel.
Below are the detailed steps:
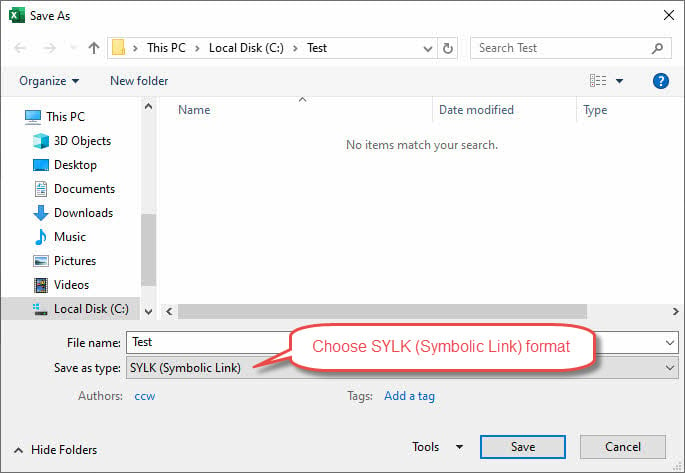
- Select File > Save As
- Choose SYLK (Symbolic Link) format

- Name the active sheet descriptively
- Click Save and confirm format changes
- Reopen the saved .slk file
- Save it back to Excel format with a new name
The SYLK format has its limitations. It only supports one worksheet, so you must repeat the above steps multiple times for multi-sheet workbooks. To solve this problem, we have developed an Excel VBA function, which can repair multi-sheet workbooks via the SYLK conversion method:
Option Explicit

Function RepairExcelFileViaSYLKConversion(SrcFile As String, DstFile As String) As Boolean
    On Error GoTo ErrorHandler

    Dim srcWb As Workbook
    Dim dstWb As Workbook
    Dim tempWb As Workbook
    Dim slkWb As Workbook
    Dim ws As Worksheet
    Dim fso As Object
    Dim srcBaseName As String
    Dim dstPath As String
    Dim slkFileName As String
    Dim sheetName As String
    Dim sanitizedName As String
    Dim isFirst As Boolean

    Set fso = CreateObject("Scripting.FileSystemObject")

    Application.ScreenUpdating = False
    Application.DisplayAlerts = False

    ' Step 1: Open source workbook
    Set srcWb = Workbooks.Open(SrcFile)

    ' Get source base name
    srcBaseName = fso.GetBaseName(SrcFile)

    ' Step 2: Save each sheet as SYLK
    dstPath = fso.GetParentFolderName(DstFile) & "\"

    If Not fso.FolderExists(dstPath) Then
        fso.CreateFolder dstPath
    End If

    For Each ws In srcWb.Worksheets
        ' Sanitize sheet name for filename
        sanitizedName = SanitizeFileName(ws.name)
        slkFileName = dstPath & srcBaseName & "_" & sanitizedName & ".slk"

        ' Copy sheet to new workbook and save as SYLK
        ws.Copy
        Set tempWb = ActiveWorkbook
        tempWb.SaveAs Filename:=slkFileName, FileFormat:=xlSYLK
        tempWb.Close SaveChanges:=False
    Next ws

    ' Close source workbook
    srcWb.Close SaveChanges:=False

    ' Step 3 and 4: Create new workbook and merge SYLK files
    Set dstWb = Workbooks.Add
    isFirst = True

    ' Get list of SYLK files
    slkFileName = Dir(dstPath & srcBaseName & "_*.slk")

    Do While slkFileName <> ""
        ' Open SYLK file
        Application.DisplayAlerts = False
        Set slkWb = Workbooks.Open(dstPath & slkFileName)
        Application.DisplayAlerts = True

        ' Copy sheet to destination workbook
        If isFirst Then
            ' Copy before first sheet and delete original
            slkWb.Sheets(1).Copy Before:=dstWb.Sheets(1)
            Application.DisplayAlerts = False
            If dstWb.Sheets.Count > 1 Then
                dstWb.Sheets(2).Delete
            End If
            Application.DisplayAlerts = True
            isFirst = False
        Else
            slkWb.Sheets(1).Copy After:=dstWb.Sheets(dstWb.Sheets.Count)
        End If

        ' Extract sheet name from filename
        sheetName = Mid(fso.GetBaseName(slkFileName), Len(srcBaseName) + 2)
        ' Rename the sheet
        On Error Resume Next ' Ignore errors (e.g., duplicate name)
        dstWb.Sheets(dstWb.Sheets.Count).name = sheetName
        On Error GoTo ErrorHandler ' Resume normal error handling

        ' Close SYLK workbook
        slkWb.Close SaveChanges:=False

        ' Next file
        slkFileName = Dir()
    Loop

    ' Step 5: Save and close destination workbook
    Application.DisplayAlerts = False ' Suppress overwrite warning
    dstWb.SaveAs Filename:=DstFile
    Application.DisplayAlerts = True
    dstWb.Close SaveChanges:=True

    ' Cleanup
    Application.ScreenUpdating = True
    Application.DisplayAlerts = True

    RepairExcelFileViaSYLKConversion = True
    Exit Function

ErrorHandler:
    ' Cleanup code
    On Error Resume Next
    If Not srcWb Is Nothing Then srcWb.Close SaveChanges:=False
    If Not tempWb Is Nothing Then tempWb.Close SaveChanges:=False
    If Not slkWb Is Nothing Then slkWb.Close SaveChanges:=False
    If Not dstWb Is Nothing Then dstWb.Close SaveChanges:=False
    Application.ScreenUpdating = True
    Application.DisplayAlerts = True
    RepairExcelFileViaSYLKConversion = False
End Function

Function SanitizeFileName(name As String) As String
    Dim invalidChars As String
    invalidChars = "\/:*?""<>|"
    Dim i As Long
    For i = 1 To Len(invalidChars)
        Dim c As String
        c = Mid(invalidChars, i, 1)
        name = Replace(name, c, "_")
    Next i
    SanitizeFileName = name
End Function
We also developed a GUI for this function. You can download the Excel file with all the functions and GUIs and run the user form MainForm.
There is only very limited information of this method on the official Microsoft web page ![]() .
.
4.2 Web Page Conversion Method
Similar to SYLK conversion method, you can also convert the corrupt Excel file to web page (HTML) format and then back to a new Excel file, to eliminate possible corruptions.
Below are the steps:
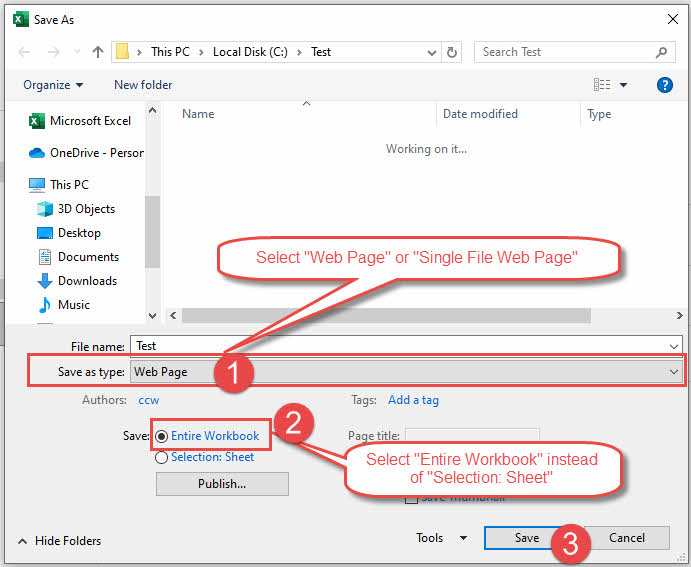
- Select File > Save As
- Select Save as type to Web Page or Single File Web Page.
- Make sure to save Entire Workbook instead of Selection: Sheet.

- Click Save, you will see the following warning, ignore it and click OK to save:


4.3 External References Recovery Approach
External references provide another way to retrieve data and recover corrupted Excel files. This technique creates links to the damaged workbook and allows data extraction without formulas or calculated values.
4.3.1 Recovery Steps
- In Excel, create a new blank workbook and save it.
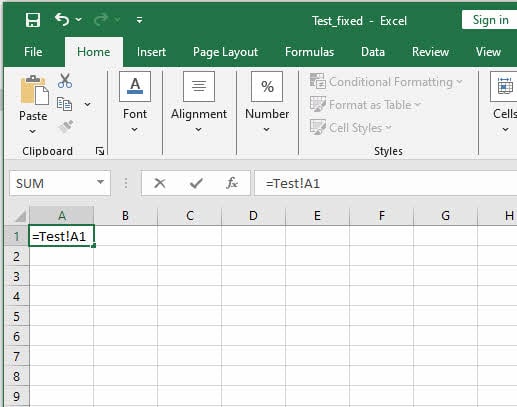
- In the first cell of the workbook, input the following formula:
=FileName!A1, where FileName is the corrupt Excel file name without the extension. For example, if your corrupt file is Test.xlsx, then the formula will be=Test!A1. After inputting the formula, press Enter.

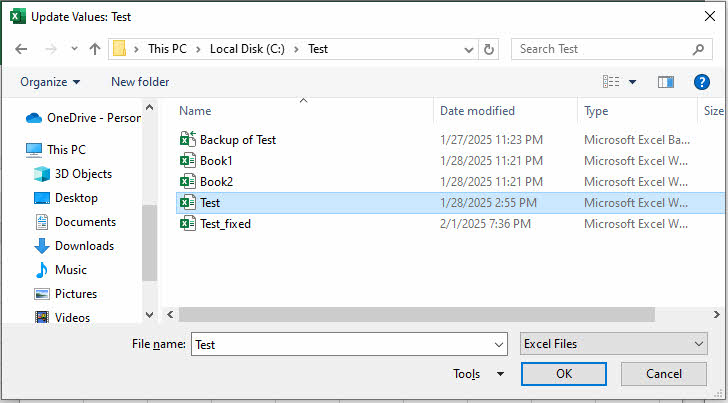
- If the Update Values dialog appears, browse and select the corrupt Excel file with the values for the external reference:

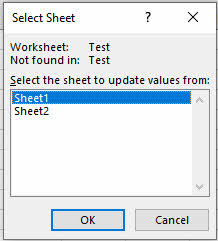
- If the corrupt Excel file has multiple sheets, you need to select the sheet for the current external reference:

- Select the A1 cell and press Ctrl + C to copy its formula.
- Starting from A1, select a range that is about same or larger than the data range in the original corrupted workbook, then press Ctrl + P to paste the formula to all cells in the selected range.
- After pasting, the Update Values dialog may pop up again, select the original corrupt workbook and click OK.
- Check if the cell values are correct. Those cells within the range of the original file will show the values in the original file. Those outside the range will show zeros.
- Select the cells you want and press Ctrl + C to copy them.
- Create a new sheet, click A1 cell, then right click and select Paste Values to paste the values only. In this way, we copy the values from the original corrupt file to the new sheet. If we choose to paste directly, then we will get external reference formulas again, instead of the values.
4.3.2 Note:
- This method will only recover data values. It will NOT recover formulas, formattings, charts, forms, and macros.
- If you encounter errors in step 6, reduce the range until succeed.
You can also find information on this method in the official Microsoft page ![]() .
.
4.4 Using Open XML SDK Tool
You can also use the Open XML SDK tool to find and fix corrupt sections in your file. To do this, please:
- Download the Open XML SDK and install it.
- Download the Open XML SDK Productivity Tool for Microsoft Office and install it.
- Start the Open XML SDK Productivity Tool for Microsoft Office
- Click File > Open File … to open the corrupt Excel file.
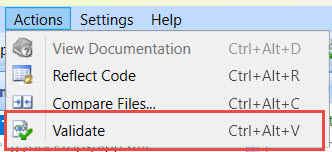
- Click Actions > Validate to validate the Excel file and find issues in the file:

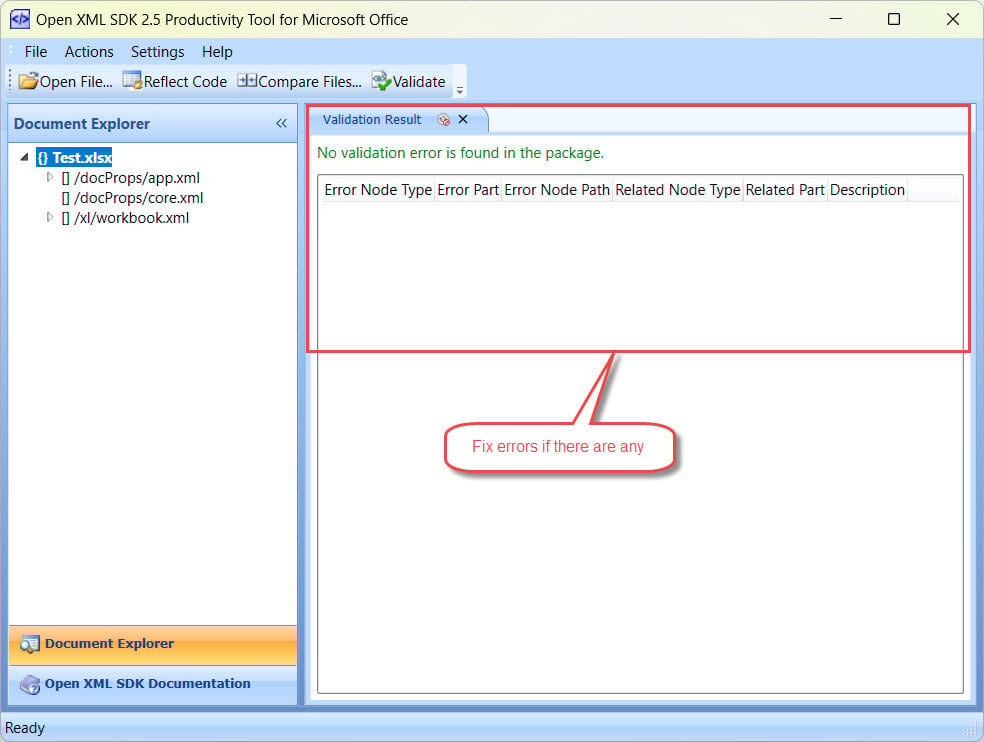
- Check the Validation Result and fix the errors in the file manually:

Note: This approach requires you to have advanced IT skills such as programming and familiar with Office Open XML file formats, thus may not work for the average Excel user.
4.5 Recover VBA Codes and Macros
Workbooks with valuable VBA codes and macros need a specialized recovery approach, as follows:
- Start Excel without launching the corrupted file.
- Set Workbook Calculation mode to Manual.
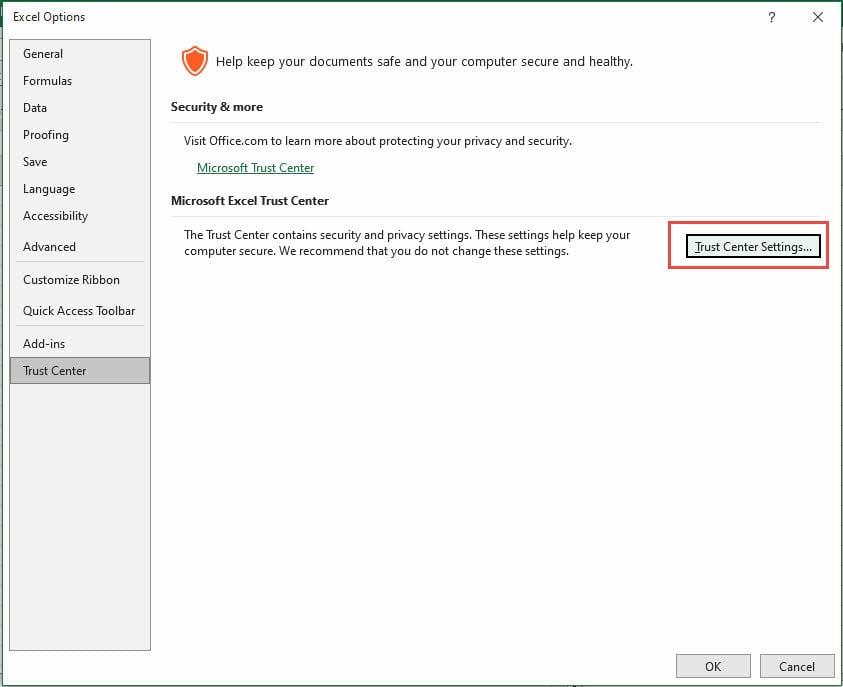
- Clik File > Options.
- In Trust Center tab, click Trust Center Settings:

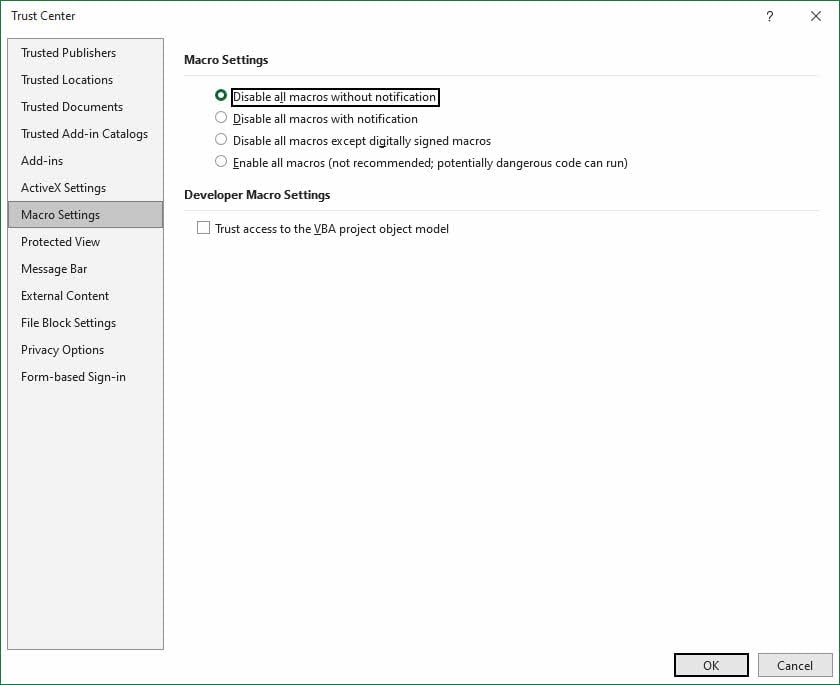
- In the popup Trust Center dialog, click Macro Settings tab and choose Diable all macros without notification, then click OK:
- Now all the auto calculations and macros have been disabled.
- Then you can open the corrupted file. If Excel can open it successfully, there will be NO notification saying the macros have been disabled, since we have chosen the no-notification option. If Excel fails to open it, then you CANNOT use this method to recover the codes any more.
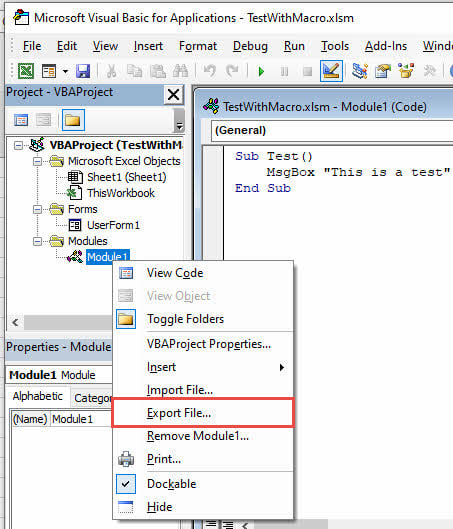
- Press Alt + F11 to open the Visual Basic Editor.
- Browse the VBAProject and choose a wanted item, such as a Form or Module, then right click it and select Export File… to export the item manually:

- Repeat step 9 until all your wanted items are exported.
- Close the Visual Basic Editor and the current file.
- Create a new workbook and import all the items back.
This method works even at times when other recovery techniques fail to restore the complete workbook functionality.
These advanced techniques complement standard recovery methods with specialized solutions for different types of corruption. Your choice between SYLK conversion, external references, or VBA recovery should depend on the specific damage and the type of data you need to preserve.
4.6 Extract Chart Data via Macro
You can also use a macro to extract the chart data from a corrupt workbook. Microsoft provides more information on the macro ![]() and how to use it
and how to use it ![]() to recover the chart data.
to recover the chart data.
5. Online Recovery Services
Online recovery services give users a web-based way to recover corrupt Excel files without installing software. Users looking for quick fixes for corrupted files are turning to these services.
5.1 Simple Recovery Procedures
Excel file recovery through online services follows these steps:
- Select a reputable online recovery service
- Upload the corrupted Excel file to the service webpage
- Enter your email address to get notifications
- Start the repair process
- Wait for the completion of the repair process
- Download the fixed file or receive it via email
These services use various algorithms to fix different types of Excel file corruption. The repair normally takes just a few minutes, which makes it a quick way to recover urgent files.
5.2 Pros and Cons
A good understanding of online recovery services’ strengths and weaknesses helps users make better choices.
Benefits:
- You can access them from any device with internet
- No need to install software or have technical knowledge
- Files get repaired quickly
- More affordable than traditional recovery methods
Limitations:
- Uploading sensitive data raises security and privacy concerns
- You need a stable internet connection
- Normally they don’t work well with severely corrupted files
5.3 Top Services
Several online platforms can recover Excel files, below are some of them:
- OfficeRecovery: leads the way as a groundbreaking cloud-based service that supports Excel versions from 5.0 through 2010. The service handles various file formats like .xls, .xlsx, and .xla.
- Recovery Toolbox for Excel: stands out in recovering data from multiple Excel formats, including .xls, .xlsx, .xlsm, .xlt, .xltx, .xltm, and .xlam files. The service offers detailed support to recover:
- Cell content and formatting
- Formulas and calculations
- Worksheet structures
- Embedded objects
- Custom styles and layouts
- Aspose: provides reliable capabilities to repair different file formats and supports XLS, XLSM, XLSX, XLSB, and ODS files. The service focuses on data security and uses encryption to protect uploaded files.
These services offer different pricing options, ranging from free simple repairs to premium subscriptions with advanced recovery features.
6. More Advanced Tools to Recover Corrupted Excel Files
Beyond the solutions already discussed, a variety of specialized Excel repair software options exist to address severe file corruption. To simplify your search, we’ve rigorously tested and compiled a detailed list of the most reliable tools, highlighting their features and effectiveness for different scenarios.
7. Other Solutions for Excel File Opening Errors
Other than file corruption, some other reasons may also cause Excel file opening failures. The symptoms and error messages may be similar or even same as those of the file corruption.
To determine whether your file is corrupt, you can copy your file to another working computer and open it in Excel to see if the error still exists. Or use the online version of Excel ![]() to check it.
to check it.
If the file can be opened on other computers or online, it is not corrupted. You can try the following solutions to fix the opening error in your computer:
- Repair Office
- Repair User Experience Virtualization (UE-V)
- Do NOT ignore DDE
- Disable all add-ins
- Reset file associations
- Disable hardware acceleration
- Install the latest updates
- Make sure there are no compatibility issues between Excel, Windows, and other software.
- Fix errors in the Windows registry .
- Close all other applications
8. Conclusion
Excel file corruption is the most important challenge businesses face today. You have multiple recovery options to fix this problem. A good understanding of the recovery methods will help protect your valuable data and keep your business running smoothly. Below is a summary:

DataNumen Excel Repair software, built-in Excel features, and online recovery services all work differently. Each option has its own benefits based on the type of corruption. Excel’s built-in recovery tools should be your first choice. For severe corruption cases, specialized software like DataNumen gives you advanced recovery features.
Note that regular backups and proper file handling are essential to prevent problems. On top of that, you need to watch for corruption warning signs. Keep your Excel software updated to reduce risks.
The right mix of prevention and recovery tools will protect your Excel files from corruption. Quick recovery becomes easier when needed. Take a proactive approach to file protection and keep multiple recovery options ready. This way, you can handle Excel corruption issues without stress.